Semaphore UI and Ansible on Ubuntu
Automation is key to a more streamlined homelab or business environment, it can take a while to set up but once you are there it makes things a lot easier and will help with recurring tasks that is a bit boring or that needs to be done the exact same way every time.
There are a lot of tools and ways to accomplish this, but here we will focus on Ansible and the usage of the Semaphore UI as the graphical UI for managing our automation's.
Prerequisites
In this guide we will focus on the Homelab and install it in latest Ubuntu LTS version and the system resources needed is pretty low but if you have the opportunity to run it as a virtual machine it is easier to add resources when needed.
For a Homelab setup i recommend the following as a starting point.
CPU: 1 Socket / 4 Cores RAM: 8GB Disk: 40GB
For a physical server it is much harder to give a precise guideline because it takes more planning ahead hardware wise, but aim for about the same or a bit more to be on the safe side.
PostgreSQL
First thing to do is to install and setup the database we will use for Semaphore UI.
Installation
Start by updating system package information.
Then we install the latest PostgreSQL version available.
Service
When installation is done we need to see if the service is started, run the following command to list all PostgreSQL services available.
Should generate a list like this where the one with a number after @ is the main service.
postgresql.service         loaded    active    exited    PostgreSQL    RDBMS
postgresql@16-main.service loaded    active    running   PostgreSQL    Cluster 16-main
If the service is not started, start it like this.
Also make sure it is enabled, to check run the following, should return enabled.
If not enabled run the following command to enable the service so that it will start on system reboots.
Configuration
Now it is time to configure PostgreSQL in preparation for installing Semaphore UI.
Start by logging in to the database.
Then set password for the postgres database user, enter the following in the db console and then set the password you want, Do not run without settings this password.
Now we will create the user for Semaphore UI, so execute the following, replace YourPasswordHere with the password you want to use..
Now you can exit psql.
Semaphore UI
When configuration of the database is done it is time to install Semaphore UI and Ansible.
User
First of we will create a ordinary user that all shall run under with minimal rights, this to ensure a safer environment in general.
We will use the username semaphore but you are free to use anything you want.
Run the following and enter the password for the user when prompted.
Packages
Now we will install some needed packages.
Semaphore
Time to get Semaphore UI package.
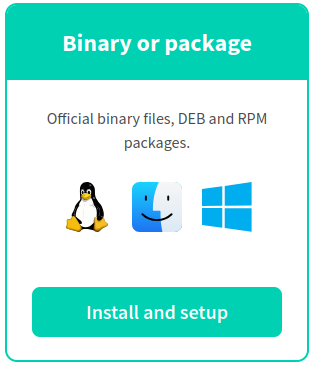
Head over to https://semaphoreui.com/install then select Install and setup under Binary or package.
On the next page change so it says Open Source at the top and make sure it has selected the latest version in the list under it.
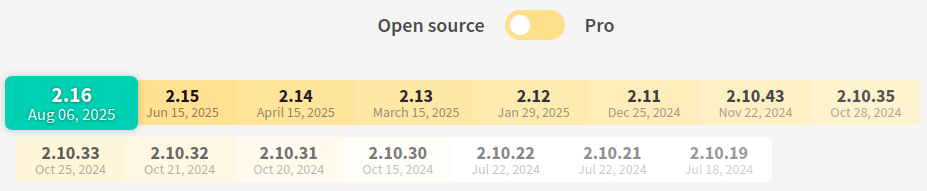
Then right click on Download for the .deb package you want to use and click on Copy Link in the menu.

Go to a local folder on you server and download it like this.
wget https://github.com/semaphoreui/semaphore/releases/download/v2.16.51/semaphore_2.16.51_linux_amd64.deb
When it is downloaded time to install it.
So run the following to install the package.
Folders
Time to add the folders for Semaphore UI and Ansible
Start by logging in to the user you created earlier, mine is semaphore.
I will put all the folders and files under a folder called system in the user home directory, but you are free to choose wherever you want, just be sure that your user has access and no other account can access that folder and all it's content.
Start by making the system folder.
Now we will create the rest of the folders inside the system folder.
Python
Now we will create a requirements.txt for the Python packages we are going to install, these are just the basics to get started, you will add to this when ever ju need a new package for ansible and this files is used for clean install and updating all packages that is defined when the service is started / restarted later on.
Start by edit the file, this will create the files when you save at the next step.
Add the following and then save it.
ansible
# for common jinja-filters
netaddr
jmespath
# for common modules
pywinrm
passlib
requests
docker
Now we shall create our Python virtual environment.
Time to activate our virtual environment for installing the packages.
Install required packages.
Deactivate the virtual environment.
Ansible
Now we will prep a requirements.yml for Ansible.
Start by editing the requirements.yml file.
Add the following and save, be sure to keep the --- at the top.
---

# Your Collections.
collections:
  - 'community.general'
  - 'ansible.posix'
  - 'community.mysql'
  - 'community.crypto'

# Future Roles add them here...
roles:
Then activate your Python environment again.
Execute the following command to install the collections.
Since we do not have any roles defined in the configuration file yet we will skip this step for now, but this is the same command that will run in the service start script we will create later.
Deactivate the virtual environment.
Setup
Time to setup Semaphore UI and create the configuration file, you will be asked a lot of questions and we will go through them in order.
Start the setup.
First question that comes up is what database we should use, choose option 3 - PostgreSQL since that is what we installed earlier.
Next question is about where your database server is located, we installed in on the same server so keep as is and continue.
Next question is about the DB user we created earlier, in our case the semaphore user, enter it and continue.
Password for the DB user, enter and continue.
Now we enter the database name, use default since there are no need to change it.
This is the path to directory where cloned repositories and generated files are stored, not sure why it is called Playbook path when the name in the config is tmp_path, set to /home/semaphore/system/tmp and continue.
Use default since we do not need it to be in a subfolder, it will be directly in the web root.
The following is up to you depending on what type of alert function you want to use, these can be configured later in the configuration file and you can see what options they have here and how to add it to your configuration file: Link
Enable email alerts? (yes/no) (default no):
Enable telegram alerts? (yes/no) (default no):
Enable slack alerts? (yes/no) (default no):
Enable Rocket.Chat alerts? (yes/no) (default no):
Enable Microsoft Team Channel alerts? (yes/no) (default no):
The following question is if we should authenticate against a LDAP Server, i will choose no since i do not use LDAP.
Now we will enter the path to where we will save the configuration file, we will put it in the config folder we created earlier.
And finally we will create our GUI user, you can enter whatever you want here as a login, this user will be the owner of the system.
To finalize the setup set correct permissions on the configuration file.
SSL
I use certificates for all my services internally and will show how to set it up for Semaphore UI, but if you do not want to use SSL you can skip this step.
first you need a valid certificate or a self signed, i will not go into how to create them here since that is a guide in itself.
When you have a certificate start by adding the certificate under the cert folder that we created earlier, the certificate must consist of 2 files whereas the first file is the so called fullchain certificate, this one contains all the information about your certificate except the private key, a fullchain certificate has information about all intermediate certificate publishers used to create your certificate unless it is a self signed. The second file is the private key for your certificate and that must exist alone in this file.
We will use the following names on the files.
Edit the configuration file.
Then add the following to the beginning of the configuration file right after the first { as shown below, match the formatting with postgres, use spaces not tabs when formatting, when done save the file and exit.
{
        "tls": {
                "enabled": true,
                "cert_file": "home/semaphore/system/cert/cert.pem",
                "key_file": "/home/semaphore/system/cert/privkey.pem"
                },
        "postgres": {
Exit the user by writing logout and continue to creating the service and we will start it all up at the end.
Service
Now to create a system service so that Semaphore UI will start automatically on system reboots.
Start by editing the service file that we are going to use.
Add the following and save, if you did any changes in paths during this guide make sure they are correct in the script to where the files are.
[Unit]
Description=Semaphore UI
Documentation=https://docs.semaphoreui.com/
Wants=network-online.target
After=network-online.target
ConditionPathExists=/usr/bin/semaphore
ConditionPathExists=/home/semaphore/system/config/config.json

[Service]
User=semaphore
Group=semaphore
Restart=always
RestartSec=10s

ExecStartPre=/bin/bash -c 'source /home/semaphore/system/venv/bin/activate \
                           && python3 -m pip install --upgrade -r /home/semaphore/system/config/requirements.txt'
ExecStartPre=/bin/bash -c 'source /home/semaphore/system/venv/bin/activate \
                           && ansible-galaxy collection install --upgrade -r /home/semaphore/system/config/requirements.yml \
                           && ansible-galaxy role install --force -r /home/semaphore/system/config/requirements.yml'

ExecStart=/bin/bash -c 'source /home/semaphore/system/venv/bin/activate \
                        && /usr/bin/semaphore server --config /home/semaphore/system/config/config.json'
ExecReload=/bin/kill -HUP $MAINPID

[Install]
WantedBy=multi-user.target
We are setting that the user we created earlier are the one running the service so that we lock down the privileges for entire Semaphore UI and our automation's.
Reload the service daemon.
Enable the service.
and finally start it.
If no errors popup check the status of the service like this.
Should a result like this, if not time to check error messages.
semaphore.service - Semaphore UI
     Loaded: loaded (/etc/systemd/system/semaphore.service; enabled; preset: enabled)
     Active: active (running) since...
If all is good time to try to connect to Semaphore UI in you browser.
the address should look something like this, with your on servername.
If you get a certificate warning and have a valid certificate, make sure your calling the server with correct name, must match what the certificate domain name it was created with.
if all is well at this step, you now have a fresh installation of Semaphore UI ready for you to explore and create automation's in.
Playbooks
The folder we created earlier called playbooks is where you can store local playbooks if you do not desire to store them in GitHub, like me, i like to have them locally, i use a separate development environment for things like this.
you can either add the playbooks folder under Repositories in the UI like this.
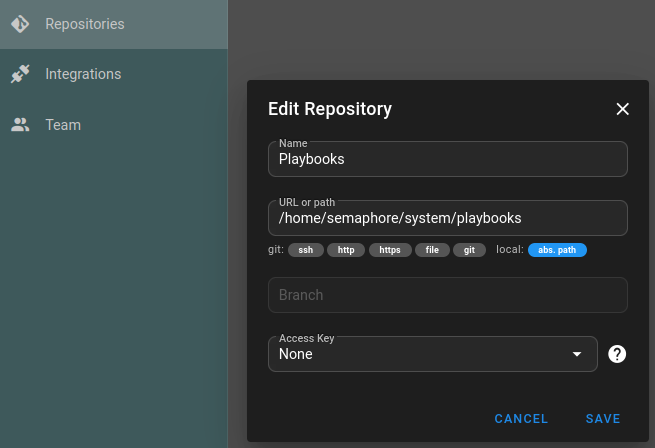
Or create new folders under it and point each repository to specific folders, or even run with the GitHub connection.
Going Forward
There are vastly more information out there on how to manage and build automation's for Ansible and Semaphore UI, but these are good starting points that i have gathered along the way in my short time of using Ansible and Semaphore UI.
Official documentation:
User guides:
User Collections and roles:
Ansible Galaxy: Link
Stay tuned for more on automation...