SIEM with Wazuh
What is SIEM?, it stands for Security Information and Event Management, in short it is a tool for provide real-time analysis of security alerts generated by applications and network hardware.
Wikipedia has a good article about SIEM if you want to read more about it here.
To simplify it, SIEM is a tool to help you find security related issues within your network so you can work proactive instead of reactive and to late, in this ever evolving threat landscape we need the help of tools like Wazuh and other SIEM solutions to show us potential security issues and give us a chance of fixing them before they get exploited.
Installation
In this how-to we will install Wazuh on a server and some clients to gather some data, for this you need a fresh install and ready to run Ubuntu installation before you proceed.
Since we are installing all parts on a single server the minimum recommended configuration is 2 CPU cores and 10GB of memory when running all three on the same server, depending on your network size you might need to scale this up later or split them into different servers all together, so make sure you have that option.
W.indexer
We will use the Wazuh installation assistant to install and configure our server.
Start by downloading it to a suitable place on your server, we will use this directory throughout the installation so make sure it is only for the installations files for Wazuh.
andEdit config.yml and set node name and ip for each service, since we plan on running it on the same server we only need to change the <indexer-node-ip> to the actual IP of the server, since we opted to run all of them on the same server you can use 127.0.0.1 as IP which i did, the node names do not matter in this case, but if you change them remember to use the correct ones when running the installations.
nodes:
  # Wazuh indexer nodes
  indexer:
    - name: node-1
      ip: "<indexer-node-ip>"
    #- name: node-2
    #  ip: "<indexer-node-ip>"
    #- name: node-3
    #  ip: "<indexer-node-ip>"

  # Wazuh server nodes
  # If there is more than one Wazuh server
  # node, each one must have a node_type
  server:
    - name: wazuh-1
      ip: "<wazuh-manager-ip>"
    #  node_type: master
    #- name: wazuh-2
    #  ip: "<wazuh-manager-ip>"
    #  node_type: worker
    #- name: wazuh-3
    #  ip: "<wazuh-manager-ip>"
    #  node_type: worker

  # Wazuh dashboard nodes
  dashboard:
    - name: dashboard
      ip: "<dashboard-node-ip>"
Save the file and install script and generate the config files. If you run a version of Ubuntu newer than 22.04 and version 4.7 of Wazuh you will get a warning about recommended version.
I installed Wazuh on 23.10 and it works, you need to use -i added on each installation command to get it to install, but keep in mind that it is not officially supported and you do so without any guarantees at all.
When the configuration .tar file is created we run the installation of the indexer node, replace node-1 with the name you set earlier if you changed it.
The output should be similar to this with no warnings or errors.
INFO: Starting Wazuh installation assistant. Wazuh version: 4.7.1
INFO: Verbose logging redirected to /var/log/wazuh-install.log
INFO: --- Dependencies ----
INFO: Installing apt-transport-https.
INFO: Wazuh repository added.
INFO: --- Wazuh indexer ---
INFO: Starting Wazuh indexer installation.
INFO: Wazuh indexer installation finished.
INFO: Wazuh indexer post-install configuration finished.
INFO: Starting service wazuh-indexer.
INFO: wazuh-indexer service started.
INFO: Initializing Wazuh indexer cluster security settings.
INFO: Wazuh indexer cluster initialized.
INFO: Installation finished.
When installation is done and no errors appeared it is time to initialize the cluster.
You would get something like this.
INFO: Starting Wazuh installation assistant. Wazuh version: 4.7.1
INFO: Verbose logging redirected to /var/log/wazuh-install.log
INFO: Wazuh indexer cluster security configuration initialized.
INFO: Wazuh indexer cluster started.
To test the installation run the following line to get the admin password for your node installation.
tar -axf wazuh-install-files.tar wazuh-install-files/wazuh-passwords.txt -O | grep -P "\'admin\'" -A 1
Then try to connect to the node to verify that the installation is successful, replace <ADMIN_PASSWORD> and <WAZUH_INDEXER_IP> with our information.
You should get an output similar to this.
{
  "name" : "node-1",
  "cluster_name" : "wazuh-indexer-cluster",
  "cluster_uuid" : "94rjrefnm94504950945ji",
  "version" : {
    "number" : "7.10.2",
    "build_type" : "rpm",
    "build_hash" : "db90a415ff2fd428b4f7b3f800a51dc229287cb4",
    "build_date" : "2023-06-03T06:24:25.112415503Z",
    "build_snapshot" : false,
    "lucene_version" : "9.6.0",
    "minimum_wire_compatibility_version" : "7.10.0",
    "minimum_index_compatibility_version" : "7.0.0"
  },
  "tagline" : "The OpenSearch Project: https://opensearch.org/"
}
Now to se that the cluster is working run the following command, replace <ADMIN_PASSWORD> and <WAZUH_INDEXER_IP> with our information.
This should present something like this.
ip        heap.percent ram.percent cpu load_1m load_5m load_15m node.role node.roles                               cluster_manager name
127.0.0.1           28          78   1    0.00    0.00     0.00 dimr      data,ingest,master,remote_cluster_client *               node-1
If everything looks ok you can continue the installation of W.server.
W.server
Run the installation of W.server now, change wazuh-1 the the name you set earlier if you changed it.
You should get similar output like this with no errors.
INFO: Starting Wazuh installation assistant. Wazuh version: 4.7.1
INFO: Verbose logging redirected to /var/log/wazuh-install.log
INFO: Wazuh repository added.
INFO: --- Wazuh server ---
INFO: Starting the Wazuh manager installation.
INFO: Wazuh manager installation finished.
INFO: Starting service wazuh-manager.
INFO: wazuh-manager service started.
INFO: Starting Filebeat installation.
INFO: Filebeat installation finished.
INFO: Filebeat post-install configuration finished.
INFO: Starting service filebeat.
INFO: filebeat service started.
INFO: Installation finished.
If you encountered no errors, the installation of W.server is complete and you can continue to install W.dashboard.
W.dashboard
Time to install the final piece of wazuh server and that is the dashboard.
Run the following command to install the dashboard.
The output should look something like this, with the exception of the password.
INFO: Starting Wazuh installation assistant. Wazuh version: 4.7.1
INFO: Verbose logging redirected to /var/log/wazuh-install.log
INFO: Wazuh web interface port will be 443.
INFO: Wazuh repository added.
INFO: --- Wazuh dashboard ----
INFO: Starting Wazuh dashboard installation.
INFO: Wazuh dashboard installation finished.
INFO: Wazuh dashboard post-install configuration finished.
INFO: Starting service wazuh-dashboard.
INFO: wazuh-dashboard service started.
INFO: Initializing Wazuh dashboard web application.
INFO: Wazuh dashboard web application initialized.
INFO: --- Summary ---
INFO: You can access the web interface https://<wazuh-dashboard-ip>:443
    User: admin
    Password: <YOURPASSWORDHERE>
INFO: Installation finished.
Now the installation is complete for Wazuh.
Try to login in to https://<wazuh-dashboard-ip>:443 where you replace <wazuh-dashboard-ip> with your IP, you will get a security warning on the certificate since it is self signed.
After login it will validate the installation and if all goes ok you will be presented with the dashboard.
Certificate
If you want to use a FQDN name instead of an IP and a valid certificate you can do so now, otherwise skip this part.
The certs for the dashboard resides in /etc/wazuh-dashboard/certs.
wazuh-dashboard.service should do the trick.
To be able to use a FQDN you network must be set up in such a way that you have your own DNS servers and can add an alias for the server, otherwise there is no point in changing the certificate.
The dashboard-key.pem must only contain the private key from you certificate and the dashboard.pem must only contain the certificate without the private key and without the certificate chain.
You should not need to edit the root-ca.pem if your certificate is issued by a public certificate authority(CA) like LetsEncrypt or other public ones, if you run your own internal CA then this needs to be changed as well, but that will not be covered in this how-to.
Edit each of the dashboard certificate files and save them, when done restart the service.
Now open your dashboard in a new tab or window and see that your certificate warning is gone when using the FQDN that matches the one in the certificate.
Clients
To get som data into the dashboard we need to install agents on the machines that we want to gather information from.
So we will go through som examples of how to do it and connect them to the wazuh server, make sure that the server/clients your adding can talk to the Wazuh server on the following ports.
- 1514/TCP for agent communication.
- 1515/TCP for enrollment via automatic agent request.
- 55000/TCP for enrollment via manager API.
First we will create 2 groups, one called Servers and one called Clients, do this by clicking on the wazuh logo at the top of the page and the go into Management / Groups.
Click the plus sign or the Add new group in top right corner and add the 2 groups above, when done go back to main page of the dashboard.
On the dashboard you will see the following message, click on Add Agent

You should be presented with a page that says Deploy new agent.
I will use one Ubuntu server and one Windows client in my examples below.
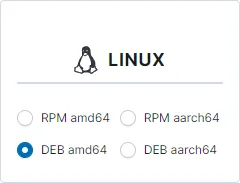
The linux agents are based on either RPM or DEB package format and if you are unsure check your linux distribution help for information on which one to choose, note that not all distributions are supported but the most common ones should be.
Example 1. Ubuntu
Step 1, for Ubuntu i choose DEB amd64 as package format.
Step 2, here i entered the IP of the wazuh server, if you going for the name of the server, be sure to have your network environment setup to handle names atop of IP, otherwise go with the server IP to be sure, i used 10.10.10.10 in my example but you should use your Wazuh server IP.

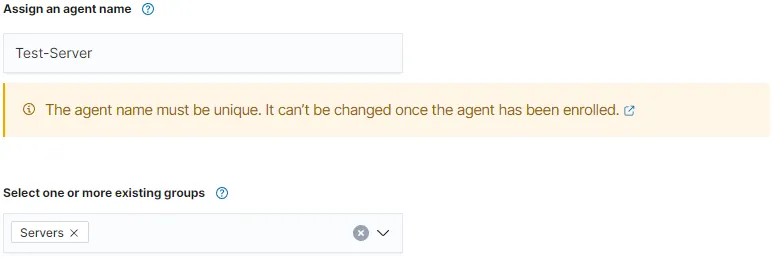
Step 3, Agent name is optional, if left empty it will take the hostname of the client, if you want to set another name you can do so here, just make sure it is unique within Wazuh, i will use Test-Server for the sake of this how-to. Since my Ubuntu is a server i will also choose the Servers group as well.
Step 4, Now you should have a installation link that you can use on the agent your adding, copy it and run it on your client.
wget https://packages.wazuh.com/4.x/apt/pool/main/w/wazuh-agent/wazuh-agent_4.7.1-1_amd64.deb && sudo WAZUH_MANAGER='10.10.10.10' WAZUH_AGENT_GROUP='Servers' WAZUH_AGENT_NAME='Test-Server' dpkg -i ./wazuh-agent_4.7.1-1_amd64.deb
The end of the installation output should contain these rows at the end to show that it was unpacked and installed successfully.
Preparing to unpack .../wazuh-agent_4.7.1-1_amd64.deb ...
Unpacking wazuh-agent (4.7.1-1) ...
Setting up wazuh-agent (4.7.1-1) ...
When the installation is done it is time to start the agent, do so by running the following commands.
$ sudo systemctl daemon-reload
$ sudo systemctl enable wazuh-agent
$ sudo systemctl start wazuh-agent
If all is good you should see the count of 1 agent on the front page of Wazuh, you can click on the number right below Total agents and the server should be listed and have the status of active, this means that the communication between them are working.
Example 2. Windows
To find the agent page again since the message on the front page is now gone since we added the server above, go to the menu by clicking the Wazuh logo and then choose Agents in the list and then on the Agents page click on Deploy new agent.
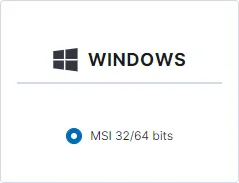
Step 1, for Windows i choose MSI 32/64 bits as format, and there is not much else to choose from at this time of writing.
Step 2, here i entered the IP of the wazuh server, if you going for the name of the server, be sure to have your network environment setup to handle names atop of IP, otherwise go with the server IP to be sure, i used 10.10.10.10 in my example but you should use your Wazuh server IP.
Step 3, Agent name is optional, if left empty it will take the hostname of the client, if you want to set another name you can do so here, just make sure it is unique within Wazuh, i will use Test-Client for the sake of this how-to. Since my Windows is a client i will also choose the Clients group as well.

Step 4, Now you should have a installation link that you can use on the agent your adding, copy it and run it on your client in an Powershell window as administrator.
Invoke-WebRequest -Uri https://packages.wazuh.com/4.x/windows/wazuh-agent-4.7.1-1.msi -OutFile ${env.tmp}\wazuh-agent; msiexec.exe /i ${env.tmp}\wazuh-agent /q WAZUH_MANAGER='10.10.10.10' WAZUH_AGENT_GROUP='Clients' WAZUH_AGENT_NAME='Test-Client' WAZUH_REGISTRATION_SERVER='10.10.10.10'
When installation is done run the following command to start the agent, if the installation was successful no error should be shown, just that the command above is done.
Now you should be able to see that you have 2 agents connected in the dashboard and get information about them.
Now you can start exploring Wazuh.
Conclusion
In this guide we installed Wazuh and connected 2 agents, this is merely scratching the surface of Wazuh, SIEM & XDR in general, but will get you started.
Most of all do not be scared of all information popping up in the dashboard when you start adding agents, take your time to check each one of the Security Alerts by clicking on them and reading up on what they mean, the system registers legit events to so not everyone of them is a sign of attacks, intrusion and so on but daily action you or your colleagues do as part of your work or you as an home user if thats the case.
There are a lot of thing you can do in Wazuh and the best thing is to go over to their site and read their documentation for how to use it, and to explore the dashboard.
Wazuh manual for current version as of writing this guide can be found here.
May the SIEM be with you...