Graylog on Ubuntu
Obsolete...
This How-To has been replaced by a newer one, please go here: Link
Logging is a essential part om network management in business environment and due to more and more internet connected smart devices making their way into our homes, a good logging solution is something i consider a must in this day and age even for home users.
Setting up a server for logging things is no easy task but one i think is needed to get a good overview af what flows through your network.
This guide aims to give you a way to install and set up a log server from start to finish.
Versions used in this How-To as of writing:
Ubuntu: 24.04 LTS / MongoDB: 7.0.16 / Graylog: 6.1.4
Requirements
To install graylog you need the following setup.
- Basic knowledge on managing linux from the
CLI. - Physical or virtual server with Ubuntu, i recommend the latest
LTSversion, but works with latest nonLTSto. - If going virtual you need to configure the CPU settings to include AVX instructions or
MongoDBwill not work. - Depending on how far back you want to keep logs, a minimum of 80GB om disk space is recommended.
- At least 6GB of system memory assigned to the virtual server or 8GB for the physical server.
- Valid SSL certificate(Will show how to create a self signed to get you started)
AVX Instruction Set
To verify that AVX support exist do the following before proceeding.
Output:
This should return a whole lot of supported instructions sets for your CPU, find that there is avx or avx2 in then somewhere like above, if not then set the correct CPU for your virtual server and try again, if it is an physical server then you need to read up on how to compile a version of MongoDB without this requirement, this is not anything we will cover in this How-To.
To get more info about AVX you can read more over att Wikipedia here: Link
MongoDB
We will start of by downloading and installing MongoDB onto our server.
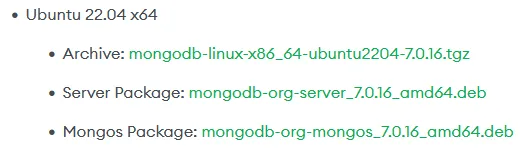
Server Package
Go to the following link and then to the section for the latest 7.x version, there lookup where it says Ubuntu 22.04 or if the have added24.04, go to that section instead, the 22.04 package works on 24.04 but better to use the ones released for that version if possible.
Link: Download MongoDB Server
Right click and choose Copy Link on the Server Package
Make sure you are in a directory where you want to store your files before continuing.
Get the package:
wget https://repo.mongodb.org/apt/ubuntu/dists/focal/mongodb-org/7.0/multiverse/binary-amd64/mongodb-org-server_7.0.16_amd64.deb
When the Server Package is done downloading we continue to the next step.
Mongosh Package
Go to the following link and then choose like the image below shows.
Link: Download Mongosh
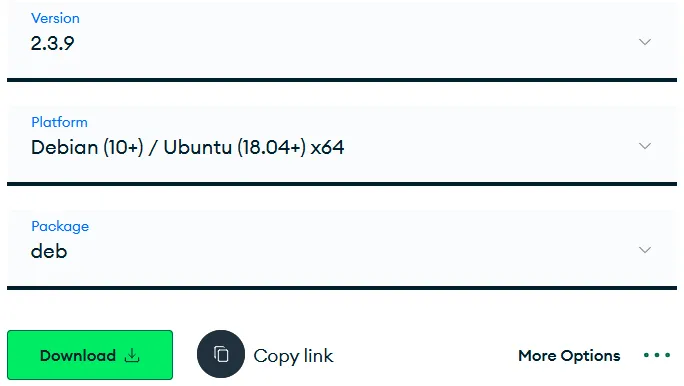
Click on Copy Link and then download it onto the server like this.
When both packages has been downloaded it is time to install them.
Installation
We will install the Server Package first, so in the directory where you downloaded the files enter the following command.
Wait until it is done installing and then continue to install mongosh package like this.
Service
When both packages are done installing it is time to enable MongoDB as a service and start it.
Enable the service with the following commands.
Configuration
When the service is up and running we will add som database configuration in preparation for installing graylog.
First we will create the admin database set, so start by copy the following to a text document and change the password you your own.
Then open a DB connection like this.
If you do not wish MongoDB to send telemetry issue this command before doing anything.
On the shell enter the following to go into admin set.
Paste your settings that you copied and changed earlier into the shell, you should get the following output back.
No enterexit and exit the shell.
Time to create the graylog database set, so copy the following to a text document and change the password to you your own
Then open a DB connection like this, enter your newly added root password to continue.
On the shell enter the following to go into graylog set.
Paste your settings that you copied and changed earlier into the shell, you should get the following output back.
No enterexit and exit the shell.
Graylog
Time to install the star of the match.
We will install it as a single node but it should be possible to expand to other nodes when needed to get a multi node cluster.
Prepare
We will now add the graylog repository in preparation of installation.
Do the following to add the repository.
Data-Node
Now we will install the data node that is the one that hold all the logs that is sent to the server.
Install the node with this command.
As noted in the OpenSearch documentation, ensure that the Linux setting vm.max_map_count is set to at least 262144.
To check the current value, run this command.
If the value is below 262144 edit the following file and set this value vm.max_map_count=262144.
Add the following at the end of the file if the parameter do not already exist, then save and exit.
Then reload the settings.
Create a new password_secret hash by running the following command, save the result in a text document for later usage.
Edit the data node configuration and add above generated hash.
Find the line that says password_secret, add the hash and save.
Do not skip this step...
This value is mandatory, and the Data Node service will not start without it. Also, save this value in a temporary file. You must add it to the Graylog server configuration file in a later step since it is crucial that this value be the same for all nodes that are members of the Graylog cluster.
Enable the Data Node service and start it.
Server
Time to add the main server interface for graylog, important to note if you planning on making a multi node cluster graylog says this about installing a data-node and the Server on the same machine.
Hint...
For production environments, we do not recommend installing and running Data Node and Graylog server on the same machine.
With that said, since we are going for a single node server we will continue.
Install graylog like this.
When done installing we need to set our admin password.
Start by generating a hashed password string.
Copy the hashed string into a text document and then edit graylog configuration..
Find the row that says root_password_sha2 on it and input the hash after =.
# You MUST specify a hash password for the root user (which you only need to initially set up the
# system and in case you lose connectivity to your authentication backend)
# This password cannot be changed using the API or via the web interface. If you need to change it,
# modify it in this file.
# Create one by using for example: echo -n yourpassword | shasum -a 256
# and put the resulting hash value into the following line
root_password_sha2 =
And finally add the hash for password_secret we generated when setting up the data-node into the same configuration file after = and then save.
# Changing this value after installation will render all user sessions and encrypted values in the database invalid. (e.g. encrypted access tokens)
password_secret =
Since we are going to use nginx as a proxy on the server we will not change the listening address of graylog since we do not want it to be reachable via non secure communication.
But if you insist on going that route you can do the following before continuing, but we will set up using SSL and secure communication in the next step in this How-To so skip this for now.
Not recommended...
sudo sed -i 's/#http_bind_address = 127.0.0.1.*/http_bind_address = 0.0.0.0:9000/g' /etc/graylog/server/server.conf
Time to enable graylog service and start it.
Check to see if it is running.
Should return 2 rows like this.
  graylog-datanode.service      loaded active running Graylog data node
  graylog-server.service        loaded active running Graylog server
Proxy
To enable secure communication we will setup nginx as a proxy in front of graylog with a SSL certificate.
Start by installing nginx.
When installation is done change folder to nginx configuration folder.
Certificate
Make a directory for your certificates.
Go into the cert folder.
Public Certificate
If you have a valid SSL certificate add it in here, the certfile.pem must contain the hashes for your own cert & the fullchain info but not private key, this one goes into the keyfile.pem file alone.
When using Lets Encrypt you will get 4 files by default, yourcertname.crt, fullchain.crt yourcertname.key & chain.crt, the last one is not used here.
They go into the 2 files like this.
certfile.pem:
-----BEGIN CERTIFICATE-----
<-Hash from yourcertname.crt file here->
-----END CERTIFICATE-----
-----BEGIN CERTIFICATE-----
<-Hash from your fullchain.crt certificate here->
-----END CERTIFICATE-----
keyfile.pem:
-----BEGIN PRIVATE KEY-----
<-Hash from your `yourcertname.key certificate here->
-----END PRIVATE KEY-----
Self-Signed Certificate
If not using a public certificate we need to create a self signed and need to come up with following information, C=Country, ST=StateName, L=CityName, O=CompanyName, OU=CompanySectionName, CN=CommonNameOrHostname, since it is self signed you can enter what you want except for CN, this one is the one that it will match on when you enter the address in the browser, if you going to use IP this one will not matter as much either.
Important to note that when using a self-signed certificate you will get certification warning when going to the server due to the fact that the certificate is not created by an public certificate authority.
There are ways around it by adding the certificate as trusted in your web browser, but that is not something covered in this How-To.
I will use this in my example and our cert will last for 3650 days or almost 10 years, this is entirely up to you, just change it to the amount of days you want to have.
Run the following command with your information to create the certificate files.
openssl req -x509 -nodes -newkey rsa:4096 -keyout privkey.pem -out certfile.pem -sha256 -days 3650 -nodes -subj "/C=XX/ST=StateName/L=CityName/O=CompanyName/OU=CompanySectionName/CN=CommonNameOrHostname"
If you open up the created certfile.pem you just created you will notice a difference, since it is a self-signed, it will only contain a single hash since it is not created by a certificate authority, this is ok in this case.
Configuration
Time to add the proxy configuration for nginx, change directory to conf.d.
Create a new file called proxy.conf like this.
Add the following information, replace www.example.org after server_name with the host name you will use when browsing to it in your browser and save the file, you cannot put an IP address here and if you use a self-signed certificate put same name here as you did on the CN parameter for the certificate and when using public certificate it must match what it was created with or you will get a certificate error.
server
{
    listen 443 ssl http2;
    server_name www.example.org;
    ssl_certificate /etc/nginx/cert/certfile.pem;
    ssl_certificate_key /etc/nginx/cert/privkey.pem;
    ssl_protocols TLSv1 TLSv1.1 TLSv1.2;
    ssl_ciphers HIGH:!aNULL:!MD5;

    location /
    {
      proxy_set_header Host $http_host;
      proxy_set_header X-Forwarded-Host $host;
      proxy_set_header X-Forwarded-Server $host;
      proxy_set_header X-Forwarded-For $proxy_add_x_forwarded_for;
      proxy_set_header X-Graylog-Server-URL https://$server_name/;
      proxy_pass       http://127.0.0.1:9000;
    }
}
Time to enable nginx and start it.
Check to see that it started ok.
Should show something like this.
● nginx.service - A high performance web server and a reverse proxy server
     Loaded: loaded (/usr/lib/systemd/system/nginx.service; enabled; preset: enabled)
     Active: active (running) since Sun 2024-12-15 16:11:30 CET; 50min ago
if all services are running the base installation is now done, there are som final steps that need to be done via the GUI so lets proceed to finalize the configuration.
Finalizing
Time to open upp our web browser to see that we can reach the server and do the final installation steps.
Start with running the following command to get the default admin password, without it we wont get far.
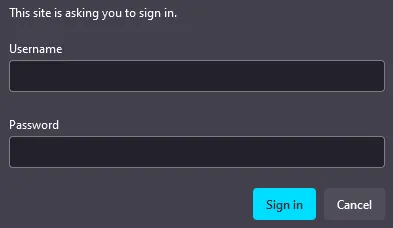
You should get a few lines where one should look like this with a password in the end, copy the username and password to a text document for now.
Initial configuration is accessible at 127.0.0.1:9000, with username 'admin' and password '**********'.
From graylog...
These credentials are for your initial preflight sign on, where you configure Data Node and set up certificates.
You must use these credentials for preflight rather than your chosen administrator password. This step ensures that, if you have not yet set up HTTPS to connect to Graylog, your administrative password is not compromised.
For subsequent sign ons, you can use the password_secret you selected during installation.
Do NOT attempt to sign on as an admin with your selected password_secret when logging in to Graylog for the first time. This WILL NOT work! You need to locate and utilize the credentials in the initial log file.
As stated above these credentials are only a first time use.
Now go to your log server in the browser and log in with above credentials when you are presented with the following window, can look different depending on what browser your running, this is with FireFox.
After login you will be greeted with a first time configuration screen.
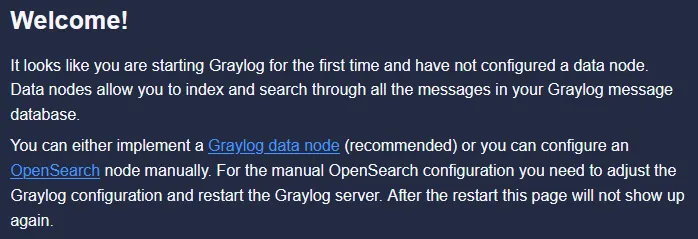
And with some configuration steps to do before we are completely done.
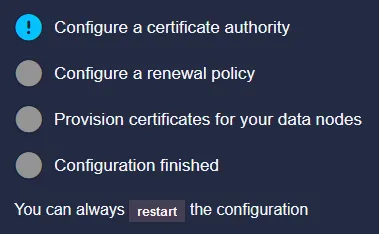
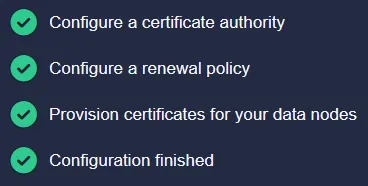
First thing to configure is what type of CA we should run, internally self hosted withing graylog or an external one, we will run with the self hosted one.
The name do not really matter for the internally one, you can choose the default name if you wish.
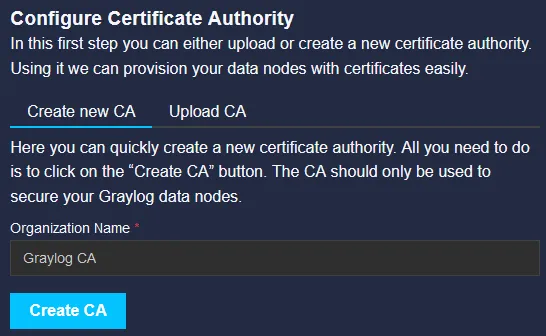
Click on the Create CA to go to the next step.
Here we will set the renewal policy for the certificates for the data nodes, this is not for the certificate used with our nginx proxy, this is for secure communication between all data-nodes and the graylog GUI.
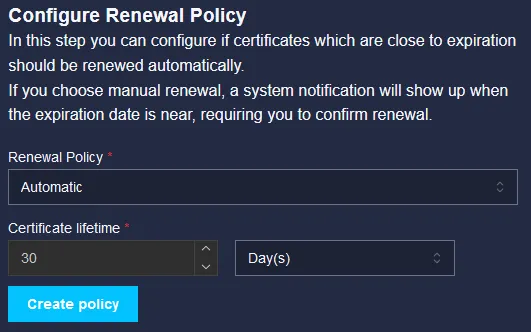
Default settings are absolutely fine in our case so click Create policy to go to next step.
Final step before configuration is finished is to provision the certificates to the nodes, even if we only run one node we need to make sure it get the settings and certificates that was generated.
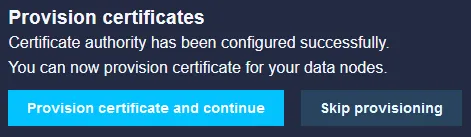
Click on Provision certificates and continue to finalize settings.
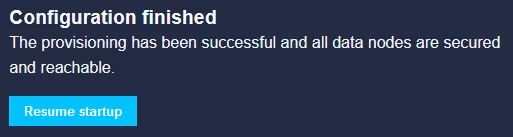
The page will stay on this step for a while but when done it will show all steps done.
And finally to proceed click on Resume startup.
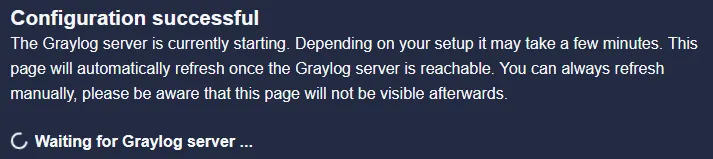
Depending on fast your server is, it will show this information before you are presented with the login page for graylog.
After this the installation is done, but we have some more steps before we are completely done with this How-To.
Remember that the password you use for the admin account from now on is the one you created a hash for and put into the root_password_sha2 earlier.
Log Inputs
Before you can start gathering logs you need to configure log inputs in graylog, so we will configure 2 inputs to get you started, one for logging via TCP and one via UDP and name them as such.
So when logged in, head over to System/Inputs in top menu and we will start configuring our inputs.
From the start both global and local inputs should show no configured inputs.
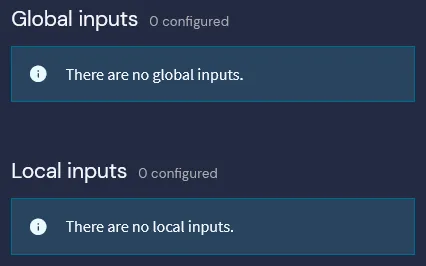
The difference between global and local inputs is that global will exist on every node within the cluster and local will only exist on the node you set it up on.
So even if we are running with one node only we will use global in case we want to expand later on, but if you configured it as a local, just edit it and tick the box at the top to make it global.
Start by selecting Syslog TCP in the input selector.

Then click on Launch new input to continue.
There are a lot of settings and depending on your preferences and you might want to configure it a bit different than what we will do here, most of the settings can be changed down the line so do not worry about setting them all.
The first things we will set is Title, Bind address, Port and setting the input as Global.
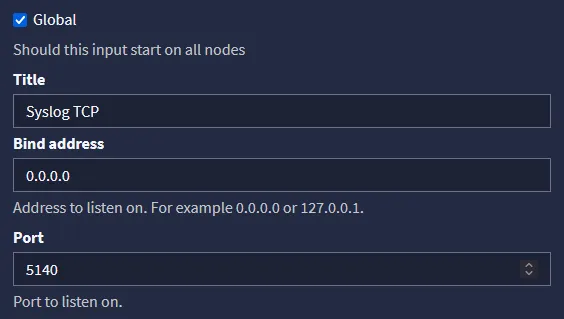
The port we set is basically 514 with an added zero at the end since we do not want to interfere with local syslog services on our server. The IP should be set to our log server IP instead of 0.0.0.0.
Then we will tick so that we store the full message and set correct Time Zone, if not this can screw up incoming data and make it out of sync, so even if it states Optional i do not consider it as such and say that it must be set.
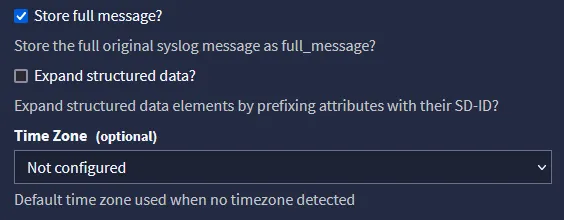
Since there are many time zones to choose from locate the one that corresponds with your servers settings and if you have different time zone settings on your server, you might have an issue at hand that needs further analysis on your side to get it to work properly unless you set them to a single time zone.

When done setting what you need click on the Launch input button to activate the input.
And then do the same but with Syslog UDP as we did above with Syslog TCP.


This one should have same settings as the first one, the only difference is that it is listening on UDP since some systems send logs via UDP instead och TCP and that is the reason we set up both of them.
Now we should have 2 inputs waiting to receive logs.
Log Shipping
To send logs to the log server there are a few ways that this is done, it depends highly on what that specific system use.
Here are some real world examples.
RSyslog
This should work on most systems running RSyslog, the placement of configuration files may differ so check where your linux distribution has placed the files.
Ubuntu
Edit rsyslog.conf.
Add the following ath the top after first comment block, replace 1.2.3.4 with your log server IP.
*.*  action(type="omfwd" target="1.2.3.4" port="5140" protocol="tcp"
    action.resumeRetryCount="100"
    queue.type="linkedList" queue.size="10000")
Save and then restart the service.
On newer systems most logs is sent to journald instead of the syslog, so if you do not get any data from the server do this to remediate the issue.
Edit journald.conf.
Edit the row that says ForwardToSyslog, uncomment and make sure it says yes.
Save and then restart the service.
Now all logs should end up on your log server.
The best way to find how to send logs from your systems is to read the manual for it or to search the internet, most systems adhere to the syslog format on logs but there are other formats and if you happened to have a system like that, explore what kind of inputs you can create in graylog to be able to receive logs from that system.
Tweaking
By default the data-node and graylog only uses 1GB of memory each so to adjust the amount of memory they can utilize we need to change settings in 2 different configuration files..
Bare in mind make sure you have enough to your OS so that you do not choke it.
As i recommended at least 6GB of memory in the start of this How-To i will base the adjustments on that and give both the data-node and graylog 2GB each to play around with and leaving around 2GB for the OS.
Graylog
Start by editing the configuration for graylog.
Change the -Xms1g and -Xmx1g on the GRAYLOG_SERVER_JAVA_OPTS line like below with a 2 instead and then save.
# Default Java options for heap and garbage collection.
GRAYLOG_SERVER_JAVA_OPTS="-Xms2g -Xmx2g -server -XX:+UseG1GC -XX:-OmitStackTraceInFastThrow"
Data-Node
Now edit the data-node configuration, if you are using several nodes and want to change memory on some or all, do this step for each node that you want to change the memory for.
Change the options -Xms1g and -Xmx1g as below and then save the file.
Service Restart
Restart each service to adapt to new memory settings.
Conclusion
Now that we have installed a log server with Graylog, we can continue to build on this by adding and starting visualizing traffic within our network.
The most important device to log is the firewall so explore your firewall manual to find out how to send logs to another server from it.
Next step is to read up on how to create filters within Graylog, this is a good way to create quick filters on what you want to see at any given time.
Happy log collecting...